How do you add Control Panel, This PC, and Network Icons, as well as My Documents icon to your Windows 10/11 desktop?
Do you often struggle to find essential icons like Control Panel or This PC on your Windows desktop? You are not alone. Most Windows operating system users find themselves in this situation. For example, you need to access and use the Control Panel ASAP, but you do not have the icon on your desktop. Or, sometimes you may want to quickly access crucial files, storage partitions, or program settings on your Windows 10/11 computer. But then, you do not have a direct access by simply clicking an icon on your desktop?
If you have found yourself in this situation, you are not alone; most of us Windows users have found ourselves in the same situation. In fact, I cannot tell how many times I have found myself in a similar situation. A time where you do not know where to find a particular setting, menu, or icon.
Why I Thought of and Created This Step-by-Step Guide to Add Control Panel, Network,
Personally, I’ve used Microsoft Windows for over a decade. As far as I can remember, I begun using Windows computers in 2011 in high school computer lab to date. That is why I have come up with a very simple step-by-step method for us. Therefore, do not worry or stress because if you follow this simple guide, you will have access to all your basic desktop settings icons. This ensures accessibility and ease of navigating your PC.
What You Will Find in This (Add Conctrol Panel, This PC) Step-by-Step Guide
In this explicit tutorial, I will guide you through how to add all the essential Windows 10 and 11 icons on your desktop for easy access and use. The icons are the Control Panel, This PC, Network, and My Documents (in some cases called User’s Files) icons.
Why Are Control Panel, This PC, and Network Icons Missing from Windows Desktop?
By default, when you install the Microsoft Windows Operating System (Windows OS) on your personal computer, it only displays dustbin on the desktop. There are two main reasons why you cannot see all Desktop Icons on your Windows 10/11 desktop. First, this is because other crucial Desktop Settings Icons are not selected and displayed during initial OS installation. The other reason is that you have hidden or deleted them from the desktop if they were available.
Now you know why some of the most important icons such as Control Panel, This PC, Network, and My Documents may not be on your desktop. Do you want to know how to add them to your Windows desktop? If your answer is “YES” then this tutorial is for you. Let me tell you why it is your guide.
The Step-by-Step Process to Add Control Panel, This PC, Network, and My Documents Icons to Windows 10/11 Desktop
Do you love easy and straightforward procedures, processes or things in life? You are not alone, I am too. I enjoy getting things done in a quite effortless way. Since we love the same thing in life, that is why you came to this blog, and I prepared this tutorial for my fellow shortcut lovers.
However, shortcuts do not mean I do not follow the right channels to do things, but I simplify the process making it amazingly simple. In my case, these icons and other Win 10/11 shortcuts make my life a lot more enjoyable with only one click.
Follow these steps to add all or your favorite of the four icons.
Step 1: How to Add Control Panel, This PC, Network, and My Documents Icons to Windows 10 Desktop
For those using Windows 10 start with step one below. If you are using Windows 11 you can skip to the next section on Windows 11. However, you can also follow the steps for Windows 10 since the difference is minimal.
Step 1.1: Opening the Personalization Settings on the Desktop
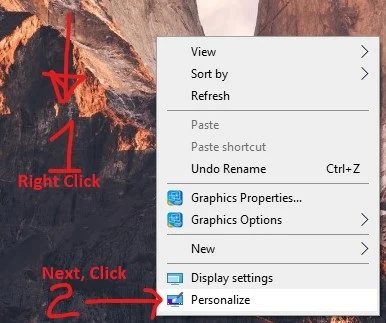
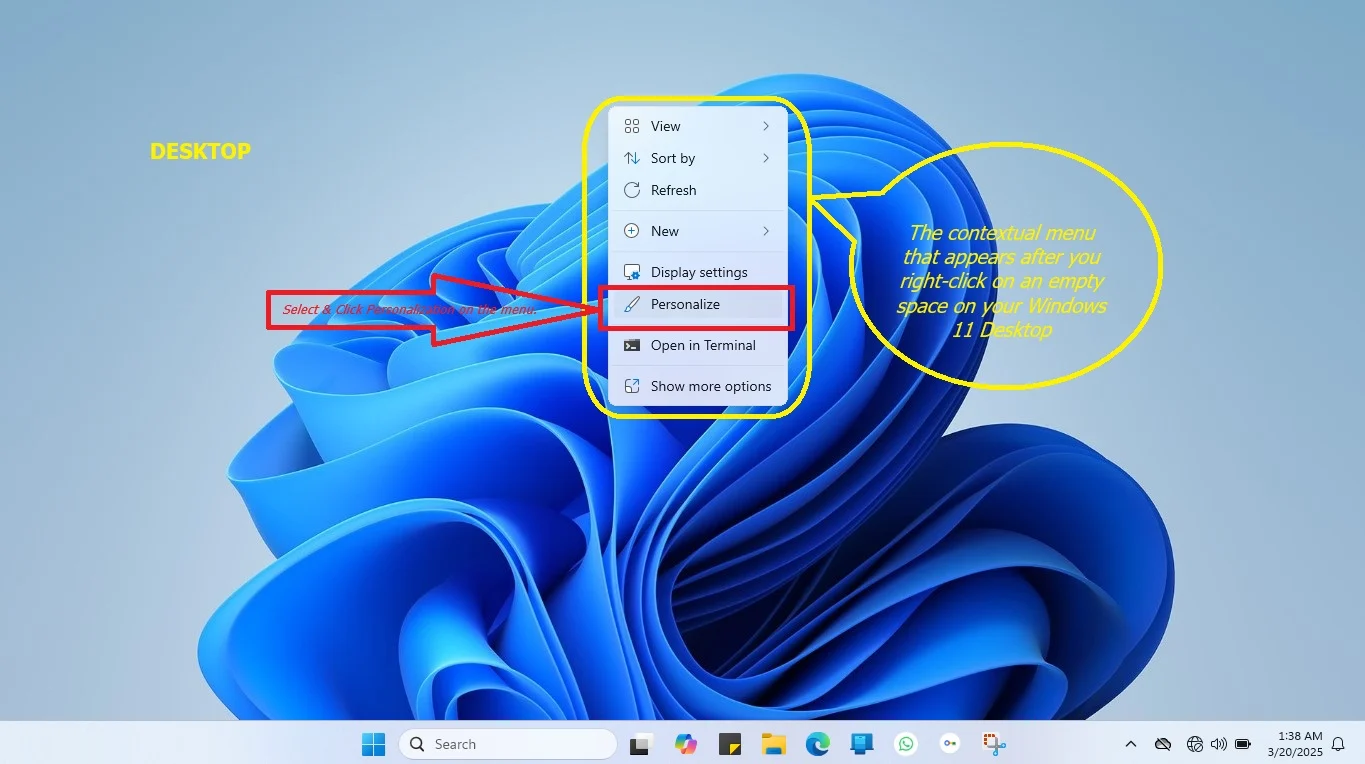
On a blank desktop area, right-click and choose “Personalize” on the contextual or popup menu that appears.
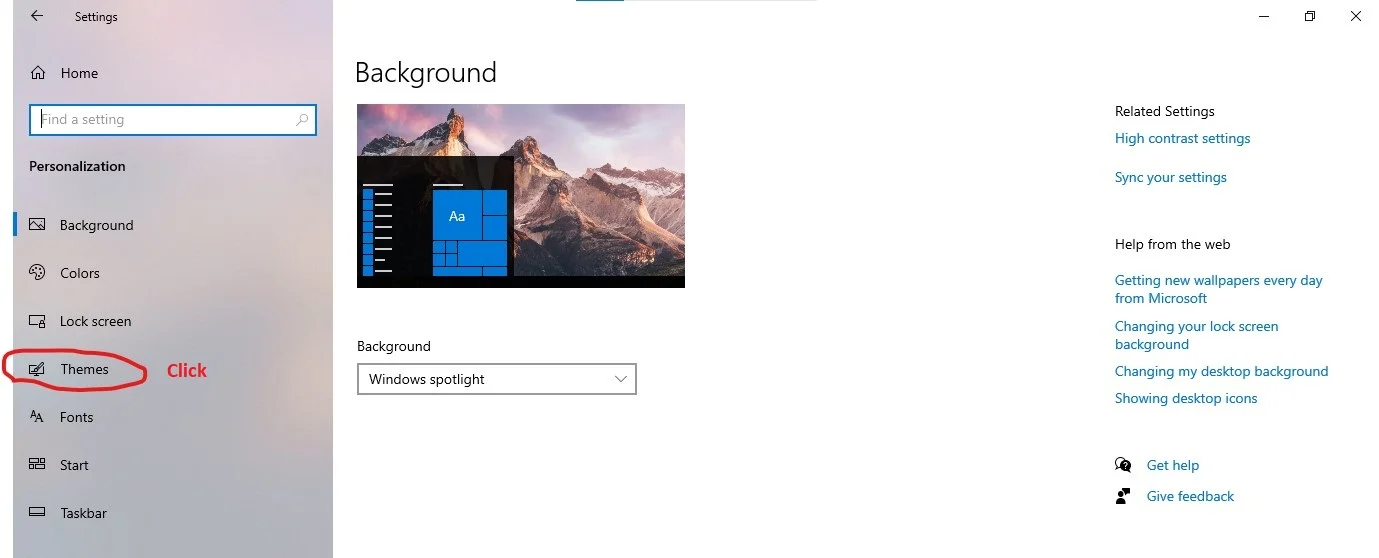
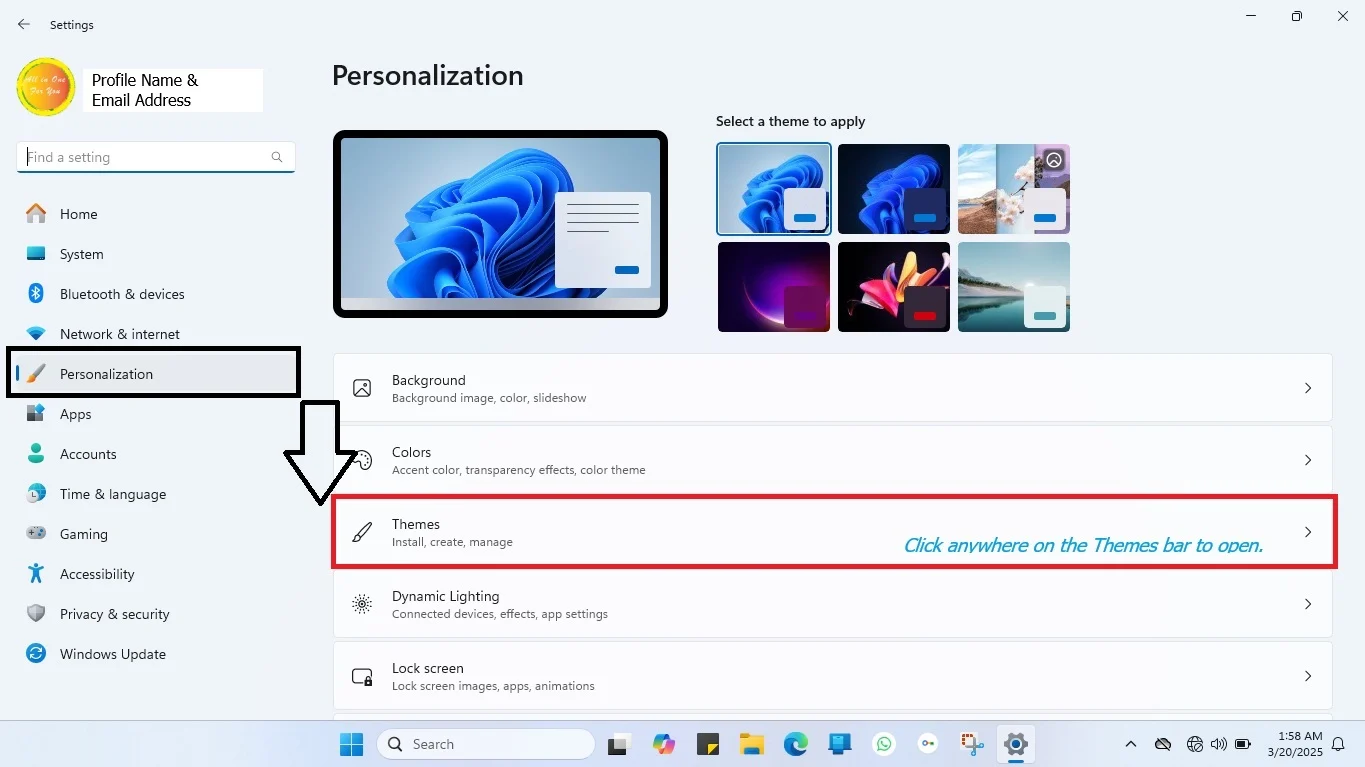
Next, in the personalization settings window that opens, select and click “Themes” on the left navigation menu.
Immediately, the Windows 10 Themes menu opens with various options to choose from.
Next, on the right-side navigation menu, under the Related Settings option click “Desktop icon settings” to open the icons panel.
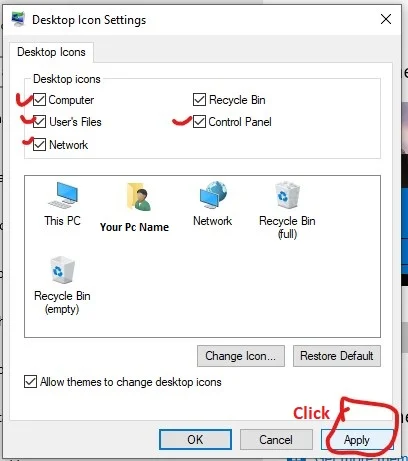
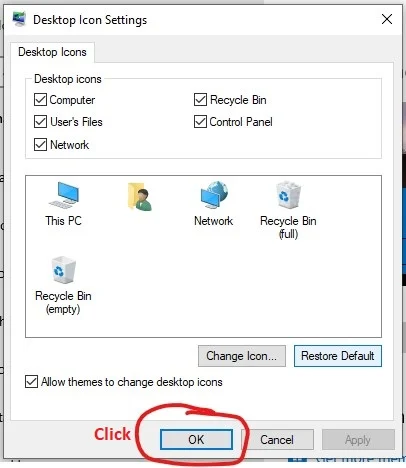
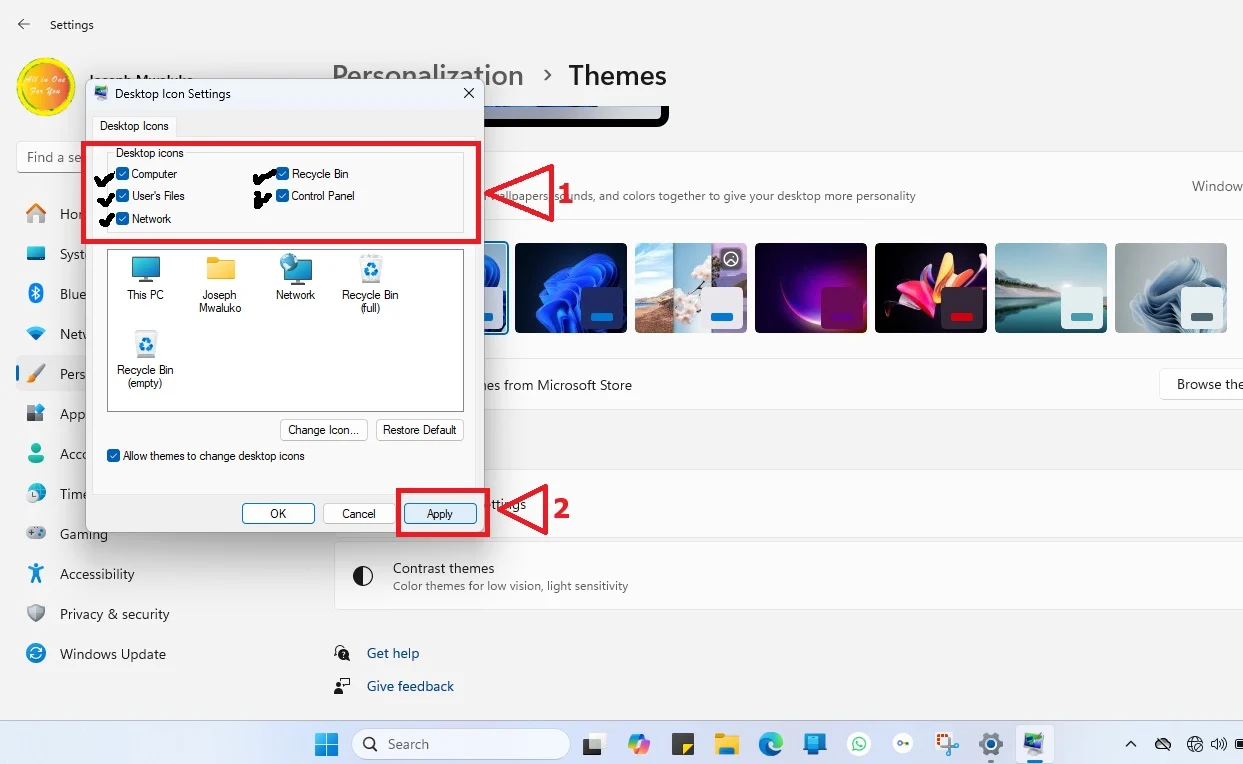
In the Desktop Icons tab, you will see four icons with unmarked checkboxes starting with Computer (This PC), User’s Files (My Documents), Network, and Control Panel. See the screenshot below.

Note: The Recycle Bin is checkbox was selected and included on the desktop by default during Windows Operating System (OS) installation on your computer. Therefore, any other marked icon will be included in the desktop alongside the dustbin.
Step 1.2: Select the desired Windows Desktop Settings Icons – Add Control Panel, This PC
Select by ticking the checkboxes for Computer, User’s Files, Network, and Control Panel. After that click the “Apply” button to effect the changes.
Thus, you add control panel, this pc, network, and my documents icons to your dekstop. Then, as shown on the screenshot below, go on to click the “OK” button to finish the process.
Step 1.3: Confirm that Icons Have Been Added to Your Windows 10 Desktop
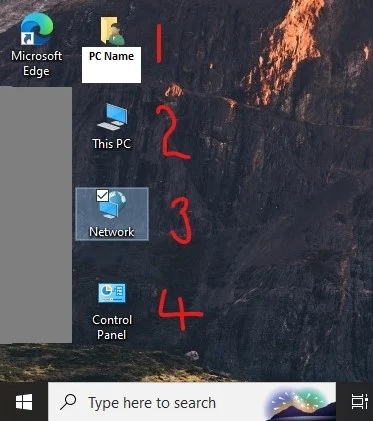
After the process is complete, head to your desktop and confirm that the Desktop Icons have been added. In this tutorial, they were added successfully as shown by number 1 – 4 in the desktop screenshot captured below.
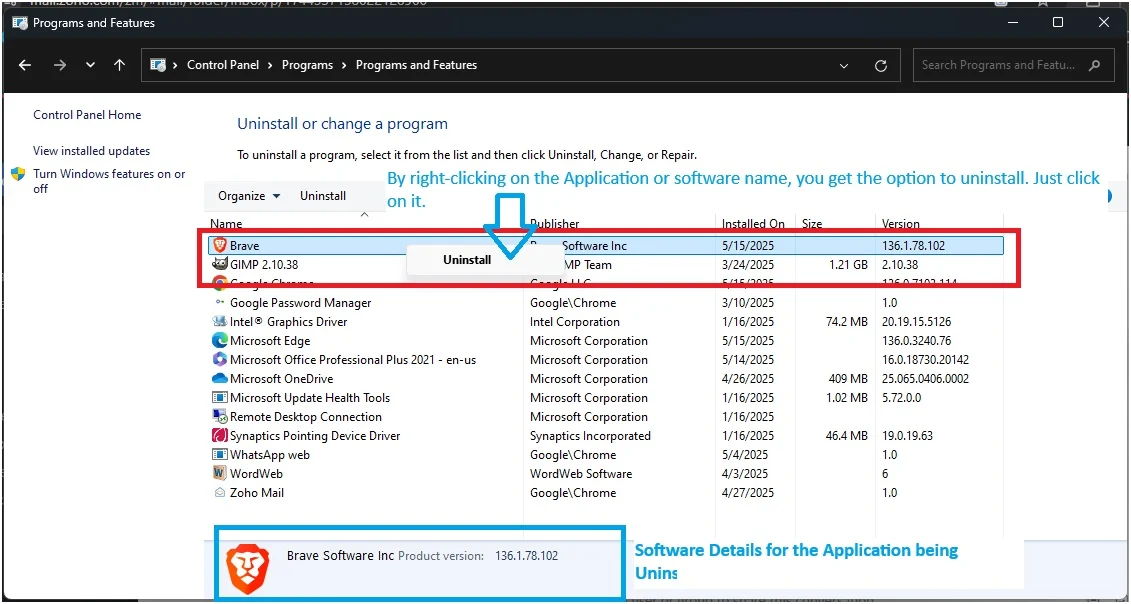
Now on into the future, you can easily use them to access your PC settings, features, and other resources as soon as you need to without long procedures. For example, to uninstall a program, you double-click the Control Panel icon on the desktop and access the uninstall options menu.
A good example is demonstrated on the screenshot below adapted from my Windows PC.
Next, let me briefly take you through the same process for Windows 11.
Step 2: How to Add Control Panel, This PC, Network, and My Documents Icons to your Desktop in Windows 11
Windows 11 is the latest version of computer operating system from Microsoft Corporation. It is an advanced version of its predecessor Windows 10. That is why the procedure for adding the Desktop Settings Icons on your PCs desktop are similar with very slight differences.
The differences are due to the advanced Windows 11 interface features. The recent interface customization in Windows 11 has shifted the menu locations and content. For example, in Windows 10 the “Related Settings” menu is on the top right side of the opened settings window. On the other hand, in Windows 11 it is near the bottom of the PC.
Step 2.1: Open the Personalization Settings on Your Win 11 Desktop to Add Control Panel, Thic PC, and Other Icons
As we did with Windows 10, on a blank desktop area, right-click and choose “Personalize” on the popup menu that appears. Your screen should look like the following after right-clicking.
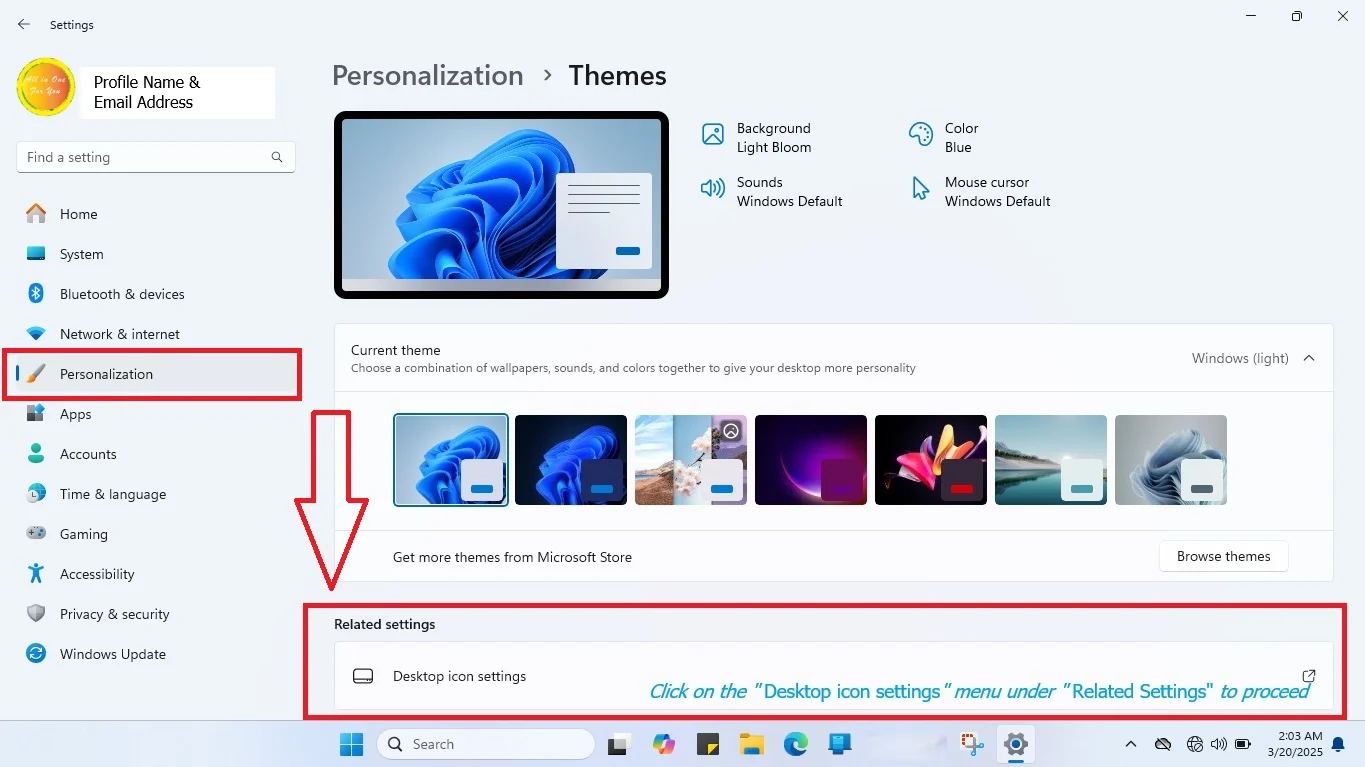
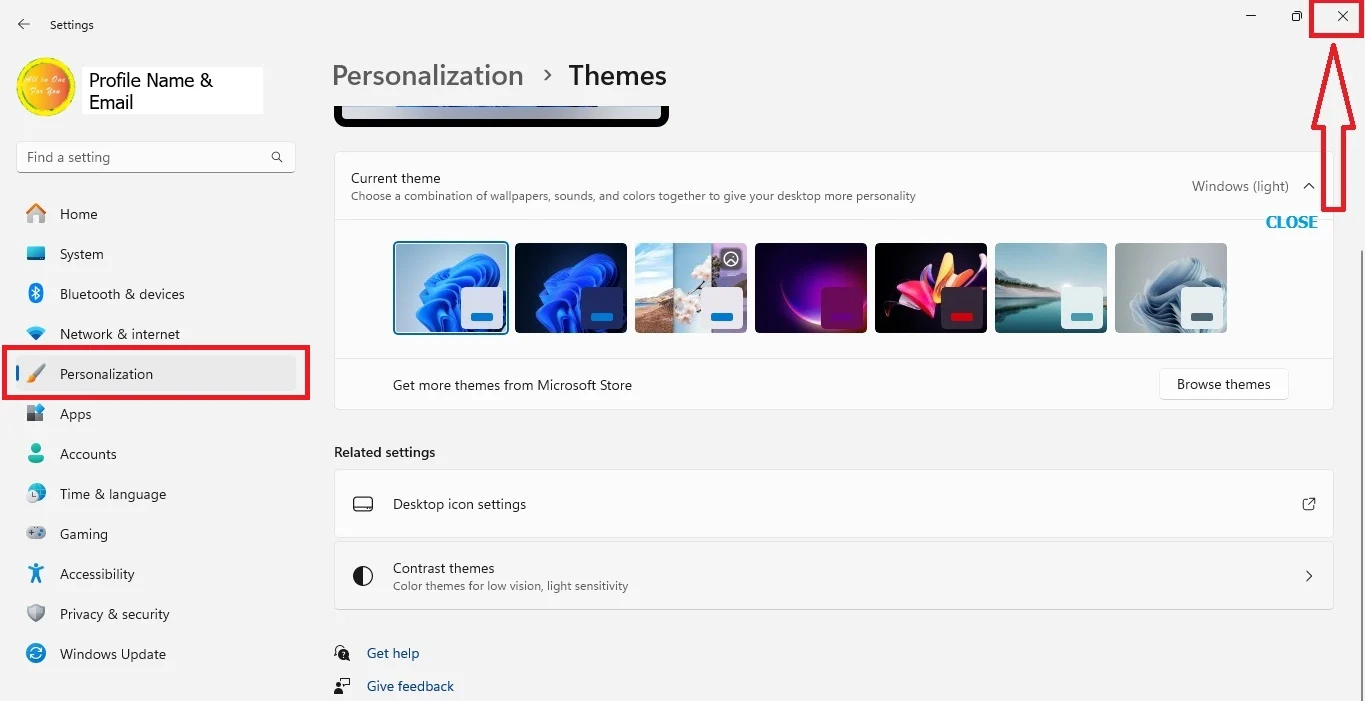
Next, in the personalization settings window that opens, select and click “Themes” on the center-right side navigation menu to the right of the left main menu. See the personalization window below screenshotted from my Windows 11.
Immediately, the Windows 11 Themes menu opens with various options to choose from.
Next, on the theme’s navigation menu near the bottom of your screen, under the “Related Settings” option click “Desktop icon settings” to open the icons panel.
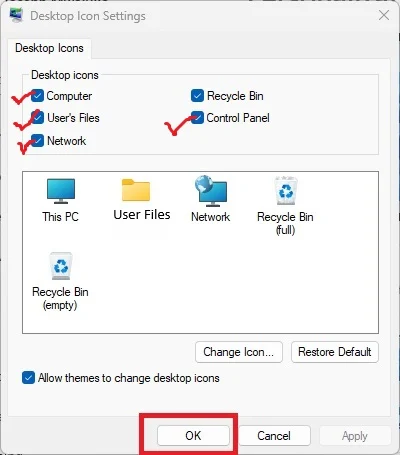
In the Desktop Settings Icons tab, you will see four icons with unmarked checkboxes starting with Computer (This PC), User’s Files (My Documents), Network, and Control Panel. See the screenshot below.
Note:
As mentioned earlier for Windows 10, the Recycle Bin’s checkbox is selected and in blue color because it was included on the desktop by default during Windows Operating System (OS) installation. Therefore, any other icon you select and mark will be included in the icons and folders list on the desktop alongside the dustbin.
Step 2.2: Select the Desired Windows 11 Settings Icons to Add to Your Desktop
Based on the screenshot I captured below, do the following as shown on it:
- Select by ticking the checkboxes for Computer, User’s Files, Network, and Control Panel.
- After that click the “Apply” button to effect the changes.
Then, as shown on the screenshot below, go on to click the “OK” button to finish the process.
Step 2.3. Confirm that Desktop Icons Have Been Added to Your Windows 11 Desktop
If you have come to this point, you are almost done. Last but not least, exit the Windows 11 Personalization Window using the close button on top right corner of the PC’s screen.
This will take you to the desktop if you do not have any open and minimized files which may automatically open and display on the screen. While on your desktop, you will realize that four new icons have been added into your desktop shortcuts list.
How to Use the Added Icons to Navigate Your PC Efficiently
Now that you have added the icons to your desktop, you can easily access and navigate your PC by clicking the various icons. By simply double clicking a desktop icon setting, your tech life and daily activities has been made easier. You can do the following from the comfort and convenience of your Windows 10 or 11 desktop.
1. Access the User Profile Folder:
This is one of the Windows OS settings icons added to your desktop from the “Desktop Icon Settings” panel under the personalization settings menu and window. It is a folder named after the person who owns the PC. For example, in this tutorial, it was added with the name “Joseph Mwaluko” because my MicrosoftOnline account for Windows 11 PC uses my official name.
By opening it (Double Click), you can access and navigate between folders under your user profile desktop icon. For example, in my case I had access to 13 folders and I could navigate them to open and use the one I want. See the demonstration screenshot I took while writing the tutorial.
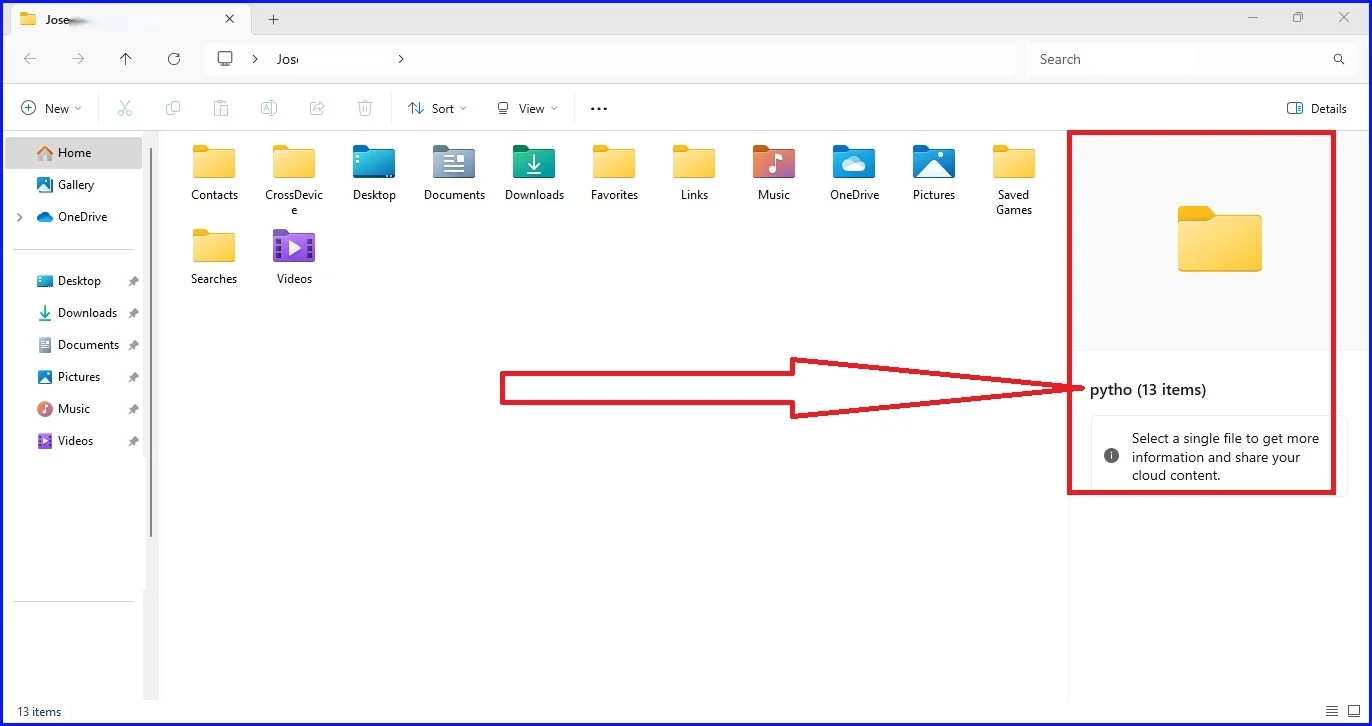
Thus, on your personal computer, the display should look the same. However, details and folders are different depending with what you have stored in your computer.
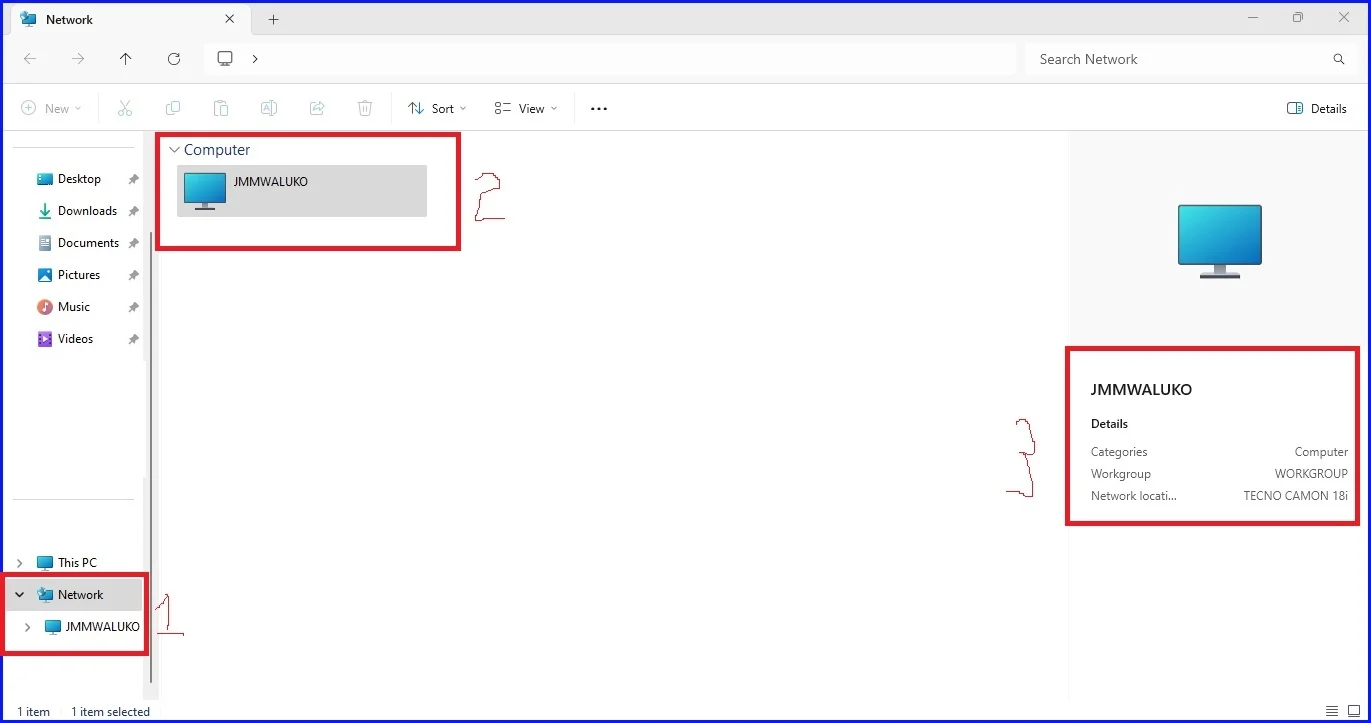
2. Access and Interact with the Network resources connected to your PC:
By double clicking using your mouse, you are able to access the network resources folder and settings.
You can see the settings your windows computer is configured, the networks available, connected networks, and other resources such printers and sharing settings. Below is an example from my PC after connecting to an android mobile device hotspot network.
3. Through This PC: Access to Devices and Drives:
Opening the “This PC” icon takes you your computer’s storage drives and other storage devices connected to it. The following is an example from my Windows 11 PC.
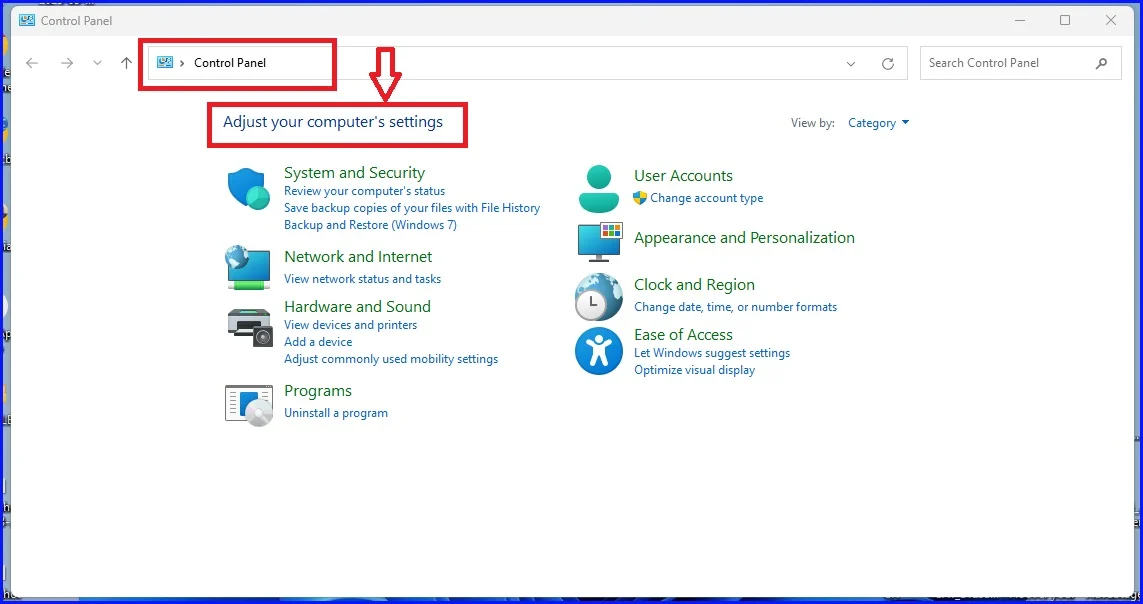
4. Access your computer settings:
By opening and following the control panel icon, you are able to view and adjust your computer settings if need be. This includes uninstalling software from your Windows 10 or 11 operating system.